
Do you want to have some effects when you click the images in a site? Example: When clicking the image, the image will pop up.
That effect is called LightBox. You may call it Lightbox, or Greybox, or Thickbox, but it’s always the same effect. Lightbox is a simple, unobtrusive script used to overlay images on the current page. It’s a snap to setup and works on all modern browsers. Light box is a really elegant image viewer addon using javascript and the prototype framework. First of all i would like to give the credits to the original maker of Light box.

After clicking one of the images.

2.Goto Design > Edit HTML
3.Find this code
and replace it with
Now you have added the scripts and styles needed for the lightbox.Next part is to add our images..
You can also add captions to your images and also group multiple images into something like a gallery..
First upload your photo using the blogger photo upload tool.Now switch to the edit html view from the post editor
Now follow the 2 instructions in this image(Click to view a bigger version.. :))
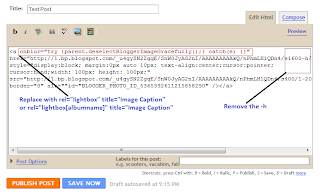
Be sure to delete the -h from s1600-h .Now you should see the light box viewer on your blog.
If you are planning to add multiple images use rel="lightbox[albumname]" title="Your Image Caption"
now if you want to add another image to this album,upload the second image and use
rel="lightbox[albumname]" title="Caption for Second image of albumname" If you do this, lightbox will work like a gallery with next and previous links
That effect is called LightBox. You may call it Lightbox, or Greybox, or Thickbox, but it’s always the same effect. Lightbox is a simple, unobtrusive script used to overlay images on the current page. It’s a snap to setup and works on all modern browsers. Light box is a really elegant image viewer addon using javascript and the prototype framework. First of all i would like to give the credits to the original maker of Light box.

After clicking one of the images.

Installation Steps
1.Login to your Blogger Dashboard or Draft Blogger Dashboard2.Goto Design > Edit HTML
3.Find this code
</head>
and replace it with
<style> #lightbox{ position: absolute; left: 0; width: 100%; z-index: 100; text-align: center; line-height: 0;} #lightbox img{ width: auto; height: auto;} #lightbox a img{ border: none; } #outerImageContainer{ position: relative; background-color: #fff; width: 250px; height: 250px; margin: 0 auto; } #imageContainer{ padding: 10px; } #loading{ position: absolute; top: 40%; left: 0%; height: 25%; width: 100%; text-align: center; line-height: 0; } #hoverNav{ position: absolute; top: 0; left: 0; height: 100%; width: 100%; z-index: 10; } #imageContainer>#hoverNav{ left: 0;} #hoverNav a{ outline: none;} #prevLink, #nextLink{ width: 49%; height: 100%; background-image: url(data:image/gif;base64,AAAA); /* Trick IE into showing hover */ display: block; } #prevLink { left: 0; float: left;} #nextLink { right: 0; float: right;} #prevLink:hover, #prevLink:visited:hover { background: url(https://blogger.googleusercontent.com/img/b/R29vZ2xl/AVvXsEix9lepgzkgwf93lurQrOQ0yvxDYiXL9PVWoMbJhNlFiZv_h_Pq2yYy8X1OqTF2Z1uYRcIcOUBHOoK4Zl30FZNkaMmzqMCE9_li1MtpOdBsKIEk5svAE_0CDzEq6bJxF6vvId9Rbn-vHyw/) left 15% no-repeat; } #nextLink:hover, #nextLink:visited:hover { background: url(https://blogger.googleusercontent.com/img/b/R29vZ2xl/AVvXsEj2vcS2hYuiEF3ZPFBuwyUy24MHSS4oGa418A1dkVnZqX9a9r3oHPASLNqDspOxNJsRsJpMAdEhcIk86S1JUKYDcE1mvFjSlfiuzi08mSBLap89trq3o7-KsCkJdGOoal5HfENVRgeRfaw/) right 15% no-repeat; } #imageDataContainer{ font: 10px Verdana, Helvetica, sans-serif; background-color: #fff; margin: 0 auto; line-height: 1.4em; overflow: auto; width: 100% ; } #imageData{ padding:0 10px; color: #666; } #imageData #imageDetails{ width: 70%; float: left; text-align: left; } #imageData #caption{ font-weight: bold; } #imageData #numberDisplay{ display: block; clear: left; padding-bottom: 1.0em; } #imageData #bottomNavClose{ width: 66px; float: right; padding-bottom: 0.7em; outline: none;} #overlay{ position: absolute; top: 0; left: 0; z-index: 90; width: 100%; height: 500px; background-color: #000; } round-color: #000; } lute; top: 0; left: 0; z-index: 90; width: 100%; height: 500px; background-color: #000; } round-color: #000; } </style> <script src='http://ajax.googleapis.com/ajax/libs/prototype/1.6.0.2/prototype.js' type='text/javascript'/> <script src='http://files.bloggerplugins.org/lbox/js/scriptaculous.js' type='text/javascript'/> <script src='http://blogergadgets.googlecode.com/files/lightbox.js' type='text/javascript'/>
</head>
Adding Images for the Lightbox Viewer
Now you have added the scripts and styles needed for the lightbox.Next part is to add our images..
You can also add captions to your images and also group multiple images into something like a gallery..
First upload your photo using the blogger photo upload tool.Now switch to the edit html view from the post editor
Now follow the 2 instructions in this image(Click to view a bigger version.. :))

Be sure to delete the -h from s1600-h .Now you should see the light box viewer on your blog.
Options Explained...
adding rel="lightbox" title="Your image Caption" will create a light box viewer for the single image.If you are planning to add multiple images use rel="lightbox[albumname]" title="Your Image Caption"
now if you want to add another image to this album,upload the second image and use
rel="lightbox[albumname]" title="Caption for Second image of albumname" If you do this, lightbox will work like a gallery with next and previous links

0 comments :
Post a Comment